Adding/optimizing SEO on custom models and creating custom social media previews
Skilled
V15.0
V 15.0
Adding and optimizing SEO is one of the most important parts for a web based application. If you have an online store, portal or a lot of online content you should take the time to create good SEO to improve your ranking. In most cases your records have a rather identical structure and you will want to set default values as meta data. In this tutorial you will learn three things:
By default Odoo has the "Optimize SEO" option in every webpage of Odoo under the "Customize" menu at the top of the page. There are a few limitations though:
# -*- coding: utf-8 -*-from odoo import models, fields, api, modules, _class Tutorial(models.Model): _name = 'tutorial' _inherit = ['website.seo.metadata'] _description = 'Tutorial for a specific object' name = fields.Char(string='Tutorial name', required=True, copy=False) preview_image = fields.Binary("Image preview", copy=False) author_id = fields.Many2one('res.partner', string='Author', copy=False) description = fields.Text(string='Intro (preview) text', copy=False)
Let's first create a menuitem, tree view and form view so that we can create our records. Since we have inherited the model 'website.seo.metadata' we inherit the fields of this model. We can now show the fields 'website_meta_title', 'website_meta_description' and 'website_meta_keywords' on the form so that you can fill in the SEO from the backend too:
First create an action to view all tutorials and a main menuitem. The action should reference our search view and the menuitem should reference the action:
Finally add a child menuitem for easy navigation:
This is all the code that we need to view and modify our records in the backend. We now need security rules to be able to view the content.
The next thing we need is security rules for this model or we won't be able to view/modify any record. Open up the 'ir.model.access.csv' file and add two security rules. One for logged in users so they can do all operations and one for public (website) users so they can view the content (which we will show on the website later on):
access_tutorial,tutorial,model_tutorial,base.group_portal,1,1,1,1public_access_tutorial,tutorial,model_tutorial,base.group_public,1,0,0,0 Tip: don't forget to import the ir.model.access.csv file in your __manifest__.py!
Now that we have the backend ready we should move to the frontend. Let's create two controller functions. The first one will show all tutorials if we open the website and go to /tutorials. The second one will open a tutorial if the user clicked on a tutorial in the overview. Create a new file named 'tutorial.py' in the 'controllers' folder and create a route that gets all tutorials and makes them available:
# -*- coding: utf-8 -*-from odoo import httpfrom odoo.http import requestclass Tutorial(http.Controller): @http.route(["/tutorials"], type='http', auth="public", website=True) def tutorial_overview(self, **kw): # Get all tutorials from the database tutorials = http.request.env['tutorial'].search([]) # Return the tutorial overview page with all tutorial records return request.render('tutorial_optimize_seo.tutorial_overview', {'tutorials': tutorials}) This controller will load all tutorials from the database if you surf to yourwebsite.com/tutorials and will load the XML page named "tutorial_overview" to show it to the user. Our next step is to create an XML record to show all tutorials on this page. Create a new file named 'tutorial_frontend_view.xml' in the 'views' folder of your module and create a new template. Let us show the name of the tutorial, the description and the author. The name will be shown as a title and should create a link to a detail page:
This view will show all tutorials under eachother with first the title, then the image and finally the text with the author. Notice how we've added a t-attf-href with a slug in the code. This will automatically convert the title of the blog into an URL that contains the title. In this URL you will also find the ID of the record at the end. This is so that we can open the detail page and handle this in the controller.
So we have an overview page with tutorials and clickable links. The next step is to handle users clicking through to the detail page of a tutorial. Open your controller again and let us add a second route that opens the detail view for the clicked tutorial:
@http.route(['/tutorial/<model("tutorial"):tutorial>'], type='http', auth='public', website=True) def tutorial_details(self, tutorial, **kw): return request.render('tutorial_optimize_seo.tutorial_detail_page', {'tutorial': tutorial, 'main_object': tutorial}) Did you notice anything odd? In the request render we also pass along 'main_object but why? 'main_object' is a builtin option from Odoo. This will tell Odoo which record you're sending to the frontend and which should be used for the SEO. Without the 'main_object' Odoo would not know which SEO content it needs to load and we wouldn't be able to customize our social media previews either. Finally, let us add a simple template named 'tutorial_detail_page' in our file 'tutorial_frontend_view.xml'. Let us just show the title and description for this demo:
Great job, we're almost done! We can now edit the SEO in the backend, see all tutorials both in the backend and frontend and we can preview the SEO. We just need one more thing: customized SEO and customized social media previews for Facebook, Twitter etc.
Now comes the most important part: influencing our SEO and social media previews! The good news is that Odoo has an existing function named '_default_website_meta' which fills in the metadata by default for all records and models. However, in most cases, you'll want to modify this so it better fits your need. By default all pages in Odoo are marked in the SEO as 'webpage' but sometimes this could be articles, just like with our model. The best part is that if you modify this type in the SEO you can also set extra SEO tags which will benefit your ranking. Open up your model 'tutorial.py' again and have a look at this code:
def _default_website_meta(self): # Overrides _default_website_meta from the abstract model res = super()._default_website_meta() # See http://ogp.me/ for all SEO options res['default_opengraph']['og:title'] = self.name + ' | Tutorials' res['default_opengraph']['og:image'] = "/web/image/tutorial/%s/preview_image" % self.id # As a tutorial can be considered an article we should mark it so in the SEO. By doing this we can add extra # tags for the article which will be indexed in search engines. res['default_opengraph']['og:type'] = 'article' res['default_opengraph']['article:published_time'] = self.create_date res['default_opengraph']['article:modified_time'] = self.write_date res['default_opengraph']['article:author'] = self.author_id.sudo().name # TIP: you could also set the article:tag and article:section parameters if you had tags on this model. # Twitter - this will set a default title and preview image for twitter. Otherwise it would be the page name # and the company logo, which is not as good. res['default_twitter']['twitter:title'] = self.name + ' | Tutorials' res['default_twitter']['twitter:image'] = "/web/image/tutorial/%s/preview_image" % self.id return res As you can see there are quite some SEO tags. In this function we'll set a default title and image. This will be the title and the image for the social media shares too. Next we change the type to 'article' so we can set a published time, modified time and author. Finally we do the same for Twitter so that the shares on Twitter also get a good looking preview.
Now save all your files, update your code and create a tutorial record in the backend. If you now open this tutorial in the website and click on 'Promote' > 'Optimize SEO' you will see that a lot of the SEO is predefined and that your social media preview looks a lot better! If something is still not as you'd like you can still modify the SEO from the backend or the frontend and Odoo will remember it. Here's an example result: 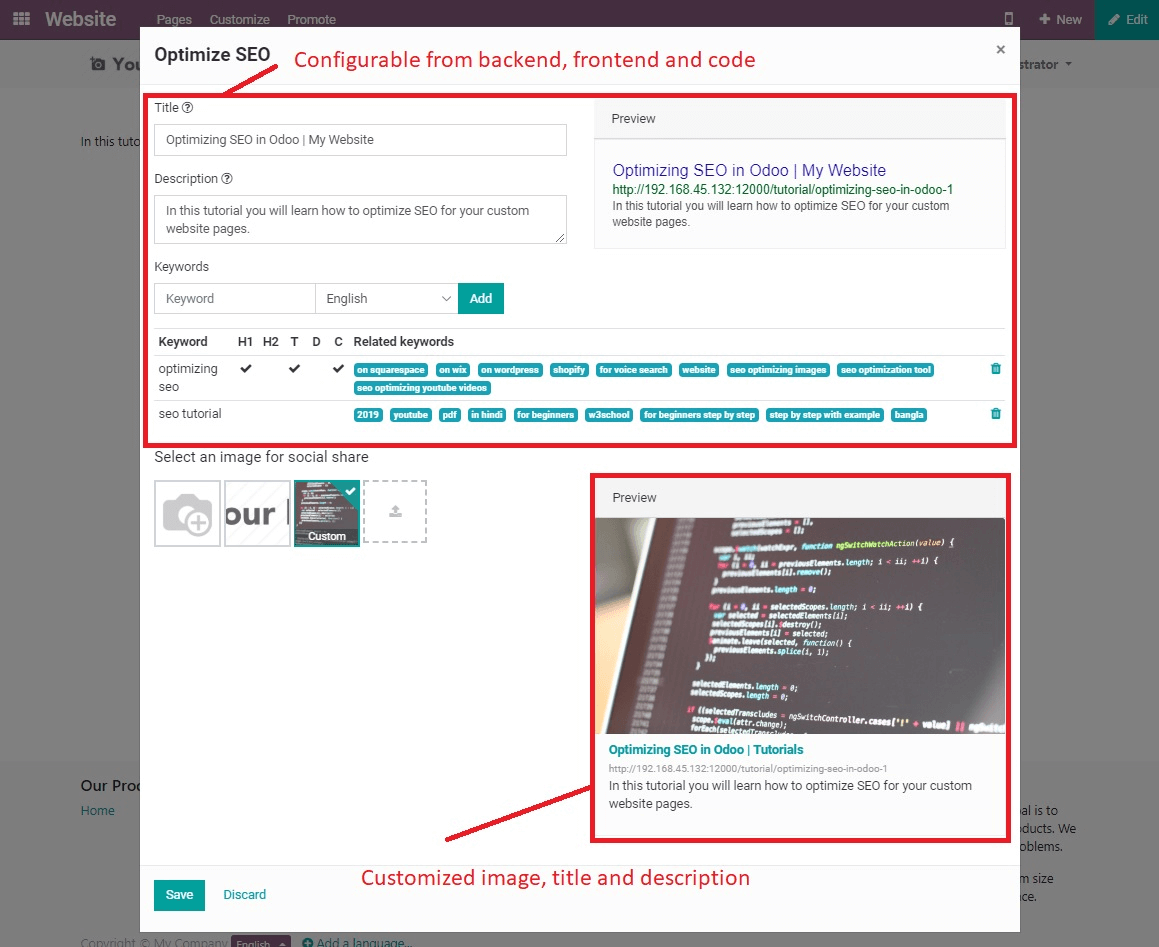
As you can see the social media previews look a lot better now and thanks to our override we have a lot more metadata set.
SEO is a very important part if you have a website and especially if you have a webshop or rely on getting a lot of views. Odoo knows this and has made quite some tools and options available to optimize your SEO. Take your time to create overrides such as in this tutorial and play around with the values and keywords to get the best SEO as possible.