Creating (internal) messages and activities in Odoo
Intermediate
V15.0
V 15.0
The mail functionalities that are available in Odoo have some of the most used features in Odoo. Odoo allows you to create internal messages, messages and activities with just a few lines of code. In this tutorial you will learn how to inherit these functionalities, how to show chatter options on your custom model and how to create messages or activities from the Python code.
Before you can use all these built in options from Odoo you will need to add a dependency to the 'mail' module. The mail module holds all the framework logic to be able to add chatter notifications, messages and activities. Open up your manifest.py file and add the dependency in. In this tutorial I'll also use the contacts module to demonstrate you the various options so also add a dependency for this module:
'depends': ['mail', 'contacts'],
Now that we have the dependency we can start by writing our own model and logic. In this tutorial I will create a model named 'contact.note' which I will use to show all the framework functionalities. If you don't want to create a new model and just want to know how to create messages or activities you can jump to chapter 5. Let's create a new file named 'contact_note.py' in the 'models' folder of your custom module. Now create a new model named 'contact.note' and add a many2one to the partner and a default text field. Your code should look like this:
# -*- coding: utf-8 -*-from odoo import models, fields, apiimport datetimeclass ContactNote(models.Model): _name = 'contact.note' _description = 'Note for a related contact' _rec_name = 'contact_id' """ Allows you to use all default chatter functionalities made by Odoo by simply inheriting You can also add the 'portal.mixin' if you want to add chatter functionalities to the Odoo frontend website. Make sure you have 'mail' as a dependency in your __manifest__.py! """ _inherit = ['mail.thread', 'mail.activity.mixin'] contact_id = fields.Many2one('res.partner', required=True) note = fields.Text(string='Note') So do you notice anything specific? In this code example there is a line '_inherit'. This inherit will inherit two objects: 'mail.thread' and 'mail.activity.mixin'. This is why we needed a dependency on the mail module as Odoo created these two objects - with their functionalities - in this module. By inheriting 'mail.thread' we have the ability to add messages and a chatter history to the records of our custom model. The inheriting of 'mail.activity.mixing' will allow us to add activities and the management of the activities on the records of our custom model. These two inherits will allow us to show messages and activities on the records, to edit them and Odoo will automatically find and show all relevant messages on the opened record.
Note: I've added an import for datetime as we will use this later on in the tutorial.
Great! We now have the dependencies and the model ready. The next step is to create a tree view and form view from where we can view and create records.
Start by creating a very simple tree view that shows the contact and the note:
The next step is to create our form view. We'll create a form view with three buttons on it. These three buttons will all demonstrate one part of the 'mail' framework its options:
We now have the basic form view but how do we show the chatter and all its records on the form view? Odoo has made this quite easy. You just have to add a div element with the class oe_chatter under the sheet (within the form). Inside this div you can then specify what you want to show. Have a look at this example:
Let me explain them one by one:
We're almost there! Let us create the Python functions for our three buttons now so that we can add internal messages, messages and activities from a button click. In a lot of cases you want to post some message or activity into the chatter when some action is done and usually that is after a button click. Open up your 'contact_note.py' file.
Let's start by creating a function for our first button. This button has the name 'generate_internal_message' which should be the name of our function. This button will add an internal message to the chatter of the record. Just take a minute to have a look at this code example for now and I'll explain it right after:
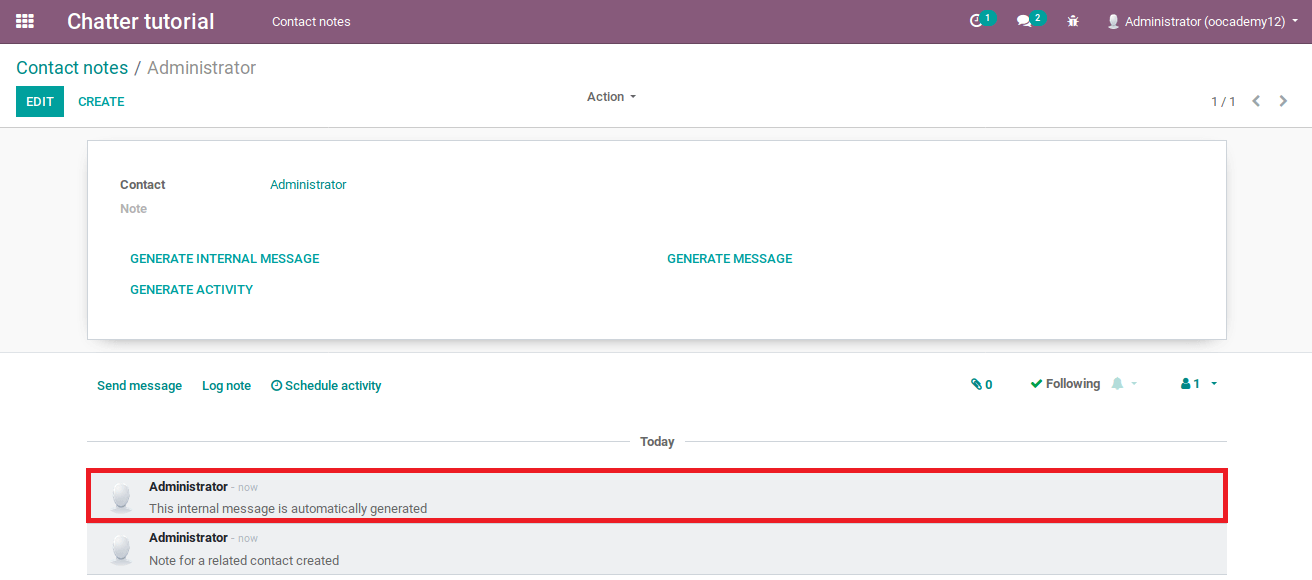
def generate_internal_message(self): # This function will generate an internal message self.env['mail.message'].create({ 'subject': 'Example internal message for contact ' + self.contact_id.name, 'message_type': 'comment', 'body': 'This internal message is automatically generated', # This type defines that it is an internal note (the boolean 'internal only' for the mail.message.subtype # record 'Note' is set to true) 'subtype_id': self.env.ref('mail.mt_note').id, # Current model and current record id 'model': 'contact.note', 'res_id': self.id }) Every chatter message that you create in Odoo goes into the model 'mail.message'. In this example we create a new record with .create({}) in which we fill up the required fields for an internal note. As you can see you can access all values from self - which holds the current record - and can use it to write messages too. The 'message_type' defines what type of message you're creating. If you choose 'comment' it will become a comment (message). If you would set the 'message_type' to 'email' it would directly send an e-mail to all followers. The 'subtype_id' is used to define if a message is an internal message or not. By default Odoo has defined a few subtypes which you can find under Settings > Technical > Email > Subtypes. This subtype, 'mail.mt_note' is a default subtype which has the boolean 'Internal only' checked on which means that this message will be an internal message. The final step is to tell Odoo to which model and which record this message is related. This is done by providing the model - 'contact.note' - and adding the current id as 'res_id'.
If you would now click on this button in the form view it would create an internal message in the chatter:
Now we need a function for our second button. This button has the name 'generate_message' which should be the name of our function. This button will add a message to the chatter of the record. The code is almost identical, it just needs another 'subtype_id' so it becomes a message and not an internal message:
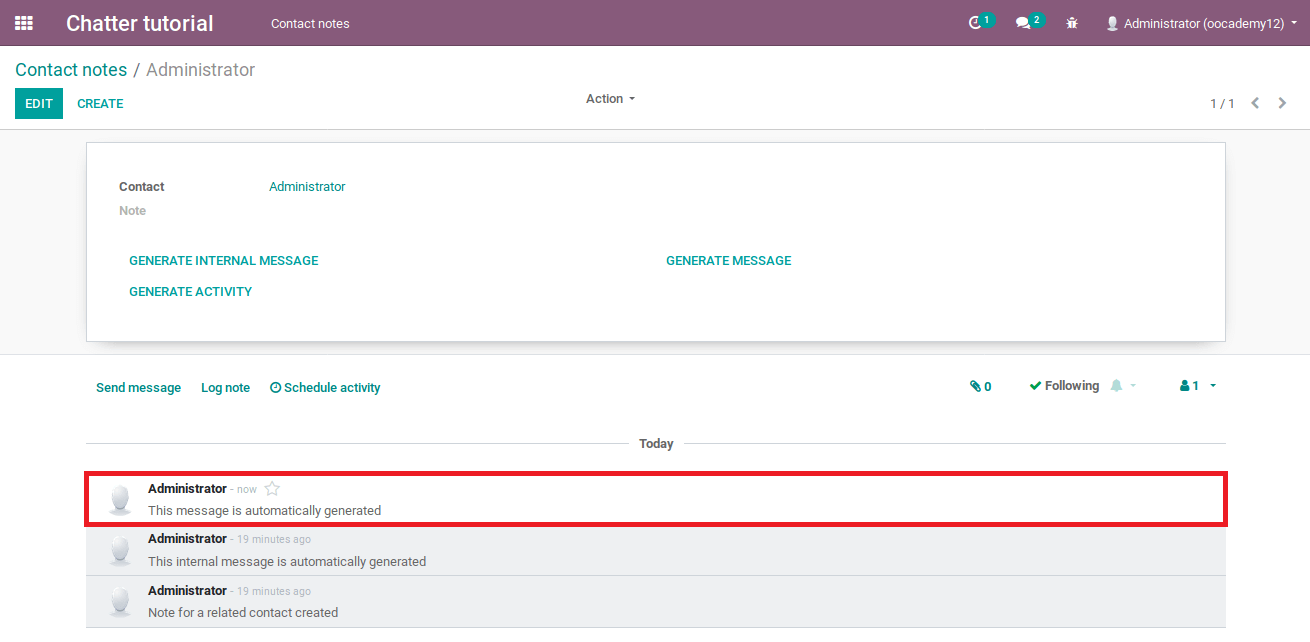
def generate_message(self): # This function will generate an chatter message (not internal) self.env['mail.message'].create({ 'subject': 'Example message for contact ' + self.contact_id.name, 'message_type': 'comment', 'body': 'This message is automatically generated', 'subtype_id': self.env.ref('mail.mt_comment').id, # Current model and current record id 'model': 'contact.note', 'res_id': self.id }) If you would now click on this button in the form view it would create a message in the chatter:
Finally we need a function for our third button. This button has the name generate_activity which should be the name of our function. This button will add an activity to the chatter of the record. Just take a minute to have a look at this code example for now and I'll explain it right after:
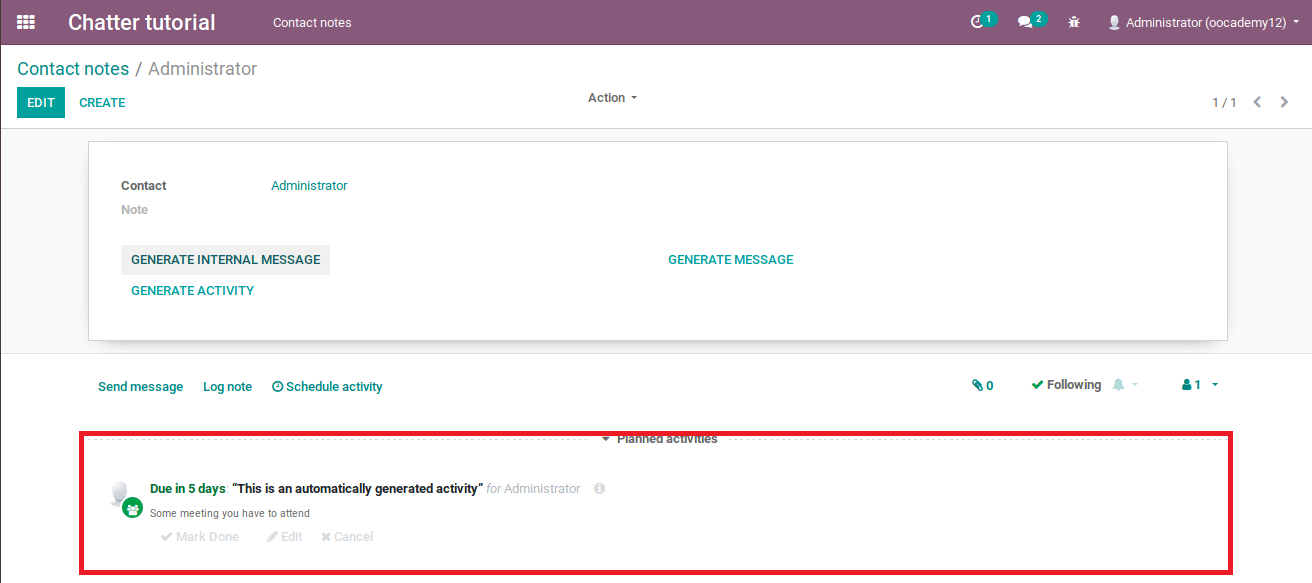
def generate_activity(self): # Will create an activity in the model mail.activity. self.activity_schedule( 'mail.mail_activity_data_meeting', summary='This is an automatically generated activity', note='Some meeting you have to attend', # Plans the activity 5 days in the future date_deadline=datetime.datetime.today() + datetime.timedelta(days=5), # Sets the current (logged in) user as responsible on the activity. user_id=self.env.user.id) Odoo has also built in a default function to be able to create activities named 'activity_schedule'. You just need to provide the function with a few values and the framework will handle the rest. Let me explain the values one by one:
If you would now click on this button in the form view it would create an activity in the chatter:
Great job, the hardest part is done now! As we've created the model, the view and the logic to create messages and activities it is now time to create a security rule. Now add a security rule in 'ir.model.access.csv' to be able to access the view and create records in it. Let's create a simple security rule that gives all users full rights on the model 'contact.note':
id,name,model_id:id,group_id:id,perm_read,perm_write,perm_create,perm_unlinkaccess_contact_note,contact.note,model_contact_note,,1,1,1,1 Alright, you're doing great, we're almost done! Now that we have the model, the view and the security rule we just need a menuitem with an action in order to open the view(s). In this tutorial I'll create a new app on the homescreen with a configuration menuitem and an action as I do not know where you'd want to build these settings. You can just change this example.
First we'll need a main menu item, which will show up as an app on the Odoo home screen. Just create a new menuitem with a name and an icon:
The last step is to create an action and submenu. The action will make sure that if you click on the menuitem that it will open up our grid view:
Finally, add a child menuitem that is clickable and that also links to the action:
That's it! If you now install this module you'll have a fully working form view with all the chatter functionalities available.
In this tutorial we have seen how to add chatter functionalities to form views which will allow you to create (internal) messages and activities. You've learned how to show the chatter history and how to create your own messages or activities on a record. The mail framework from Odoo is incredible robust and flexible and allows you to quickly create and manage chatter functionalities. It is without a doubt one of the best and most used features in Odoo.