Creating tours in Odoo
Beginner
V15.0
V 15.0
Tours are a great way in Odoo to show people the main features of an Odoo app. With tours you can guide a user through steps while giving feedback to the user along the way. You can see an Odoo tour as an interactive way to learn people the main features without needing to show it yourself. It is fully automated. In this tutorial you will learn how to create a tour with steps inside the 'contacts' app.
Let us create a new module to start. You can either manually create a module or create one with the scaffold command from Odoo. Now that you've created your module you should add the dependency to the module where you want to create a tour. In this tutorial we will create a tour that guides the user through the contacts app.
The first thing to do in order to create a tour is to create a JavaScript file. In Odoo you should place all JavaScript code under /static/src/js so create these folders first. Create these new folders and then create a new JavaScript file named 'tour.js'. Now open up your JS file and define a new function. In this function you should require 'web.core' and 'web.core.tour' and include 'core._t' in order to manage translations later on.
odoo.define('tutorial_creating_tours.example_tour', function(require) { "use strict"; // Minimal requirements needed to create a tour var core = require('web.core'); var tour = require('web_tour.tour'); // Allows you to translate tour steps var _t = core._t;}); You now have the basic JavaScript structure ready. It is time to register a tour and to add steps to the tour. Let's create a tour with four steps:
Let us start by creating a tour where we can add steps in:
tour.register('example_tour', { url: "/web",}]); This is the minimal code needed to define a tour. The tour.register function will tell Odoo that you want to add a new tour in Odoo. "example_tour" is the technical name of the tour and should always be unique. The next line shows "url" which tells Odoo on which page the tour should start (in this tutorial from the home screen).
Now let us create the four steps that we want the tour to follow. The first step will show a blinking icon on the homepage, under the 'Contacts' app. Let us add a step to the tour:
, [tour.stepUtils.showAppsMenuItem(), { trigger: '.o_app[data-menu-xmlid="contacts.menu_contacts"]', content: _t('Want to manage your contacts? It starts here.'), position: 'bottom', } 'tour.stepUtils.showAppsMenuItem()' is built in in Odoo so that Odoo knows it should start from the homescreen and show a blinking icon under the app on the homescreen. The 'trigger' will tell Odoo when exactly that you would want to trigger the tour step. In this example our tour would start on the main Odoo screen and will show a little icon under the contacts app. If you hoover over the icon it would show the text "Want to manage your contacts? It starts here". Finally, the 'position' line will tell Odoo where you'd like to show the icon and text. In this example it will be shown under the app.
The next step in our tour is to show a blinking icon under the 'Create' button so that the user knows he/she has to click on create:
, { trigger: '.o-kanban-button-new', extra_trigger: '.o_res_partner_kanban', content: _t('Let\'s create your first contact by clicking on create.'), position: 'bottom',} So why the 'extra_trigger'? If we wouldn't set an extra check on this step you would see this tour step on every kanban view. By setting the extra_trigger '.o_res_partner_kanban' the tour will only be shown on the contacts view and nowhere else. In most of the steps in Odoo you'll want to add an extra_trigger to make sure that Odoo doesn't show it all over the place.
Alright, we're on the form view for creating a new contact now. Now let us show a blinking icon to the right of the 'Name' field. As Odoo tours can also be automatically run (from the developer tools by clicking on 'Run tours') we should also make sure this field is automatically filled in if the tour is run automatically:
, { // The trigger will tell that you would like to input a value in the field 'Name' trigger: 'input[placeholder="Name"]', extra_trigger: '.o_form_editable', // This is the 'hint' / tooltip that is shown to the end user content: _t('Fill in the name of the contact.'), // When you run the test (from the developer tools) it will automatically fill in 'James Cook'. run: 'text James Cook', // The position of the blinking icon and text is to the right of the 'Name' field. position: 'right',} Finally, let us create the fourth and last step. This step should show the user a blinking icon under the save button after a name is filled in:
, { trigger: '.o_form_button_save', extra_trigger: '.oe_avatar', content: _t('Click on save to save your new contact. You can use this contact throughout Odoo later on.'), position: 'bottom',} That is all! You've now got the JavaScript code to create a tour. Your file should now look like this:
odoo.define('tutorial_creating_tours.example_tour', function(require) { "use strict"; // Minimal requirements needed to create a tour var core = require('web.core'); var tour = require('web_tour.tour'); // Allows you to translate tour steps var _t = core._t; tour.register('example_tour', { url: "/web", // You can find all step options at: // https://github.com/odoo/odoo/blob/master/addons/web_tour/static/src/js/tour_step_utils.js // // - showAppsMenuItem(): shows a tour blinker on the app that you mention. // - toggleHomeMenu(): shows a tour blinker to go back to the zhome screen of Odoo. }, [tour.stepUtils.showAppsMenuItem(), { trigger: '.o_app[data-menu-xmlid="contacts.menu_contacts"]', content: _t('Want to manage your contacts? It starts here.'), position: 'bottom', }, { trigger: '.o-kanban-button-new', extra_trigger: '.o_res_partner_kanban', content: _t('Let\'s create your first contact by clicking on create.'), position: 'bottom', width: 200, }, { // The trigger will tell that you would like to input a value in the field 'Name' trigger: 'input[placeholder="Name"]', extra_trigger: '.o_form_editable', // This is the 'hint' / tooltip that is shown to the end user content: _t('Fill in the name of the contact.'), // When you run the test (from the developer tools) it will automatically fill in 'James Cook'. run: 'text James Cook', position: 'right', }, { trigger: '.o_form_button_save', extra_trigger: '.oe_avatar', content: _t('Click on save to save your new contact. You can use this contact throughout Odoo later on.'), position: 'bottom', }]);});
You now have your tour coded but the tour is not yet loaded into Odoo. A tour will only become available in Odoo after you've added it into the Odoo assets. Open up the `__manifest__.py` file, add the `assets` option and insert the tour.js file into the backend assets bundle. Your code should look like this:
                     {
     ...

     'assets': {
         'web.assets_backend': [
             'your_module_name/static/src/js/tour.js',
         ]
     }
 }
This will tell Odoo that you want to add the tour into the assets and that you want to use it within Odoo.
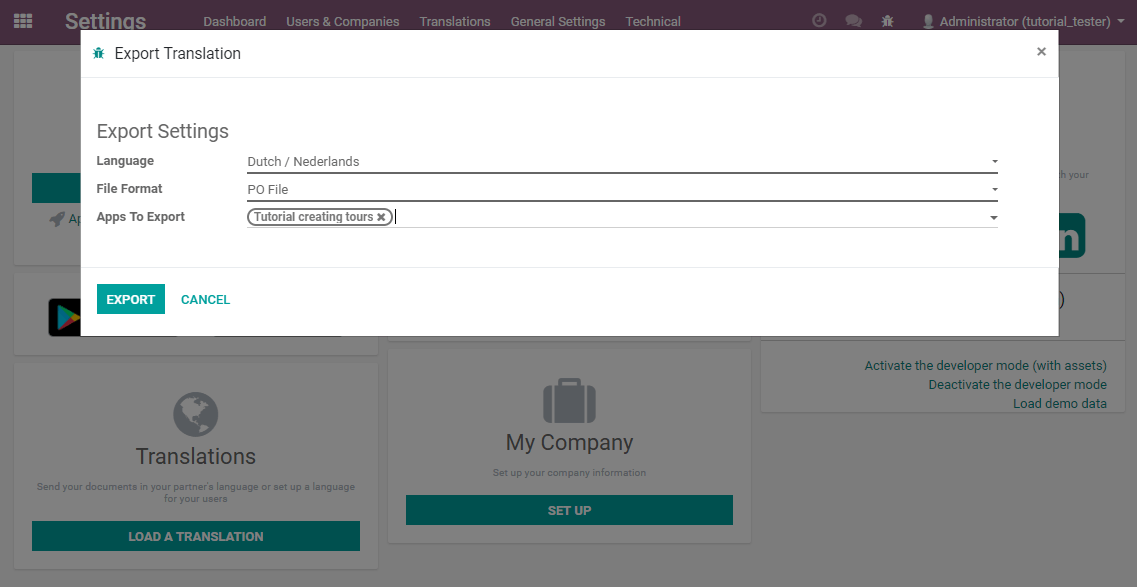
Now what if you have Odoo users that speak different languages? Luckily you can also translate tours to any installed language. Activate developer mode and then go to 'Settings' > 'Translations' > 'Export translation'. You'll now see a dialog from which you can choose the target language and where you can select your app. Select your target language, choose the file format 'PO File' and choose your app. Finally click on 'Export':
Create a new folder 'i18n' in your module and add the downloaded file into this folder. You can now open the file and translate all the source terms. If you then update your module and switch to another language you will see that the tour steps are translated for your user.
Because of the built-in framework from Odoo it is very easy to create a tour for users. With this tour you can guide a new user through your own custom development in a matter of minutes and with personalised text. Creating tours is really quick - once you know them well - and needs just a few lines of code. If you're building modules for thirdy party use you should really consider adding a tour so that your users can get familiar with your module.