Setup Odoo behind Nginx with a custom SSL certificate
Specialist
V15.0
V 15.0
Running a web application behind Nginx and running it on SSL for security reasons has become very important. If you don't run your web application on a secured connection you will even be sanctioned by Google, resulting in your web application dropping in the search results. Since Chrome 68 you will even get not secure warnings. Since running secure web applications and running them smooth and fast has become so important this tutorial is here to help you.
In this tutorial you will learn how to install Nginx, how to configure Nginx and how to add your own SSL certificate to your website. In this tutorial I host my server at DigitalOcean, my website at a Dutch hosting provider (Antagonist and I've bought my SSL certificate at Xolphin.com.
The first step is to configure both your DNS at your domain provider and your server its domain settings at your hosting provider. Your server needs to know that it should point to an URL and the DNS needs to know that your URL should load content from your server. Go to your hosting provider its platform and setup a DNS record there. It is different for every hosting provider but most of them have a networking tab where you can setup a hostname and value. An example from my own provider with the configuration:

Now go to your domain provider and setup DNS records that will tell the DNS which IP it should get data from when you go to the URL. The DNS record should be an 'A' record which points from the domain name to the IP of your server. An example from my own domain provider with the configuration:

Technically speaking you could just have one rule from 'mywebsite.com' to the IP of the server. I usually setup two just in case if some redirect on the server is not right then it will still work on DNS as you also have www.mywebsite.com listed.
Now that both the DNS and the server can find eachother we can start on the server. SSH to your server and install Nginx on it:
sudo apt-get install nginx The next step is to configure the default file from Nginx. You can find it under /etc/nginx/sites-available/default and under /etc/nginx/sites-enabled/default. Edit both of these files and make sure that they have the following configuration set:
server { listen 80; rewrite ^(.*) https://$host$1 permanent;} This will make sure that Nginx listens on port 80 (the default web port) and that it rewrites all your URL's to HTTPS. Now we just need to create a configuration file for our Odoo instance.
Our Nginx is installed and configured but there is still nothing that tells Nginx to connect our Odoo - which runs on some port - to the default port 80 in order to load it when you surf to the website URL. Lets create a new configuration file for this under /etc/nginx/sites-available/odoo.conf:
sudo nano /etc/nginx/sites-enabled/odoo.conf Copy the following configuration in your file, go through it and I will explain it afterwards.
# odoo serverupstream odoo { server 127.0.0.1:8069;}upstream odoochat { server 127.0.0.1:8072;}# Expires mapmap $sent_http_content_type $expires { default off; text/html epoch; text/css max; application/javascript max; ~image/ max;}server { listen 443 ssl default_server; proxy_read_timeout 7200s; proxy_connect_timeout 7200s; proxy_send_timeout 7200s; client_max_body_size 500m; expires $expires; proxy_max_temp_file_size 5924m; # Add Headers for odoo proxy mode proxy_set_header Host $host; proxy_set_header X-Forwarded-Host $host; proxy_set_header X-Forwarded-For $proxy_add_x_forwarded_for; proxy_set_header X-Forwarded-Proto $scheme; proxy_set_header X-Real-IP $remote_addr; proxy_set_header X-Client-IP $remote_addr; proxy_set_header HTTP_X_FORWARDED_HOST $remote_addr; # SSL parameters # Make sure that this points to the folder that holds your custom crt and key file ssl_certificate /etc/ssl/your_folder/YourDomainValidationSecureServerCA_Bundle.crt; ssl_certificate_key /etc/ssl/your_folder/some_website_com.key; ssl_session_timeout 30m; ssl_protocols TLSv1 TLSv1.1 TLSv1.2; ssl_ciphers 'ECDHE-RSA-AES128-GCM-SHA256:ECDHE-ECDSA-AES128-GCM-SHA256:ECDHE-RSA-AES256-GCM-SHA384:ECDHE-ECDSA-AES256-GCM-SHA384:DHE-RSA-AES128-GCM-SHA256:DHE-DSS-AES128-GCM-SHA256:kEDH+AESGCM:ECDHE-RSA-AES128-SHA256:ECDHE-ECDSA-AES128-SHA256:ECDHE-RSA-AES128-SHA:ECDHE-ECDSA-AES128-SHA:ECDHE-RSA-AES256-SHA384:ECDHE-ECDSA-AES256-SHA384:ECDHE-RSA-AES256-SHA:ECDHE-ECDSA-AES256-SHA:DHE-RSA-AES128-SHA256:DHE-RSA-AES128-SHA:DHE-DSS-AES128-SHA256:DHE-RSA-AES256-SHA256:DHE-DSS-AES256-SHA:DHE-RSA-AES256-SHA:AES128-GCM-SHA256:AES256-GCM-SHA384:AES128-SHA256:AES256-SHA256:AES128-SHA:AES256-SHA:AES:CAMELLIA:DES-CBC3-SHA:!aNULL:!eNULL:!EXPORT:!DES:!RC4:!MD5:!PSK:!aECDH:!EDH-DSS-DES-CBC3-SHA:!EDH-RSA-DES-CBC3-SHA:!KRB5-DES-CBC3-SHA'; ssl_prefer_server_ciphers on; # log access_log /var/log/nginx/odoo.access.log; error_log /var/log/nginx/odoo.error.log; # Redirect requests to odoo backend server location / { proxy_redirect off; proxy_pass http://odoo; location ~* .(js|css|png|jpg|jpeg|gif|ico)$ { expires 2d; proxy_pass http://odoo; add_header Cache-Control "public, no-transform"; } } location /longpolling { proxy_pass http://odoochat; } location /web/static/ { # cash static data proxy_cache_valid 200 60m; proxy_buffering on; # How quick static data expires (and is reloaded on the next request) in seconds expires 864000; proxy_pass http://odoo; } # common gzip gzip_types text/css text/less text/plain text/xml application/xml application/json application/javascript; gzip on;} Quite a block of code right? Let us split it up block by block so I can explain it in more detail. The first block, the 'upstream Odoo', will tell Nginx that the Odoo instance is running locally on port 8069. Thanks to this Nginx knows where the Odoo is at and can redirect the content.
The second block, 'upstream odoochat' will tell Nginx that the Odoo chat is running on port 8072.
The third block, 'map', will tells Nginx what the default action is. It will tell Nginx how long it takes before content expires, in our example it tries to keep the content as long as possible. The 'max' value corresponds to 10 years.
The fourth block, 'server' is where most of the configuration is done. It will tell Nginx the following things:
Now there are just two more parameters that are really important. The 'ssl_certificate' and the 'ssl_certificate_key' values. These will make sure that Nginx loads your SSL certificate and its key in order to load your website in HTTPS. Make sure that the 'ssl_certificate' links to your '.crt' file and that the 'ssl_certificate_key' links to your key file (where you created the certificate with):
ssl_certificate /etc/ssl/your_folder/YourDomainValidationSecureServerCA_Bundle.crt; ssl_certificate_key /etc/ssl/your_folder/some_website_com.key; In this example the crt file would be under /etc/ssl/your_folder together with the private key. If you don't have those certificate files here yet you should add them in this custom folder. The rest of the file is quite standard. If you'd like to learn more about the configuration you can read the official Nginx documentation. Save your configuration file and close it.
Great job! We're almost ready. Now copy over the configuration file from 'sites-available' to 'sites-enabled' as we want to activate this configuration file and use it for our website. You can just copy over the file:
ln -s /etc/nginx/sites-available/odoo.conf /etc/nginx/sites-enabled/
That's it! You've installed and configured Nginx to run your website with your SSL certificate. Now reload the Nginx so that your new configurations are applied:
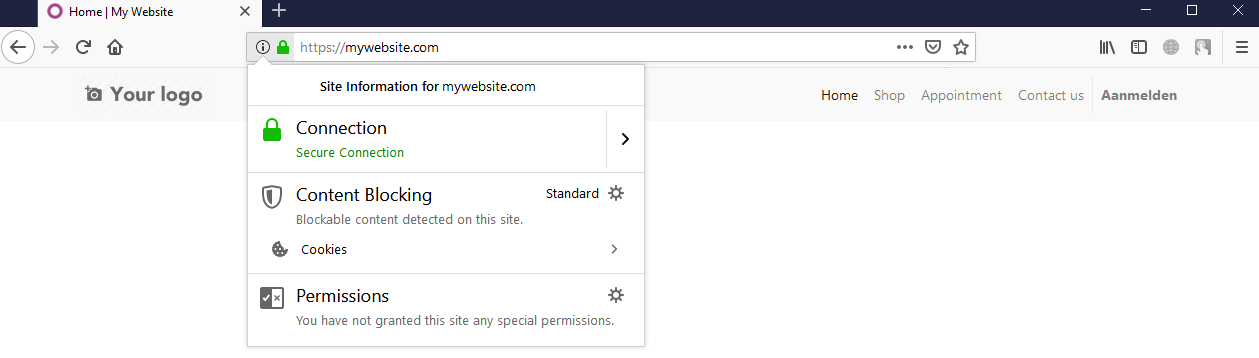
sudo service nginx reload If you did everything correct the Nginx will reload and your website is now online (on HTTPS). If you have any issues you'll get a warning from Nginx. In this case look in the logfile under /var/log/nginx in the file 'error.log'. You should get quite detailed feedback there. Now surf to your website URL and you will see your Odoo instance running on HTTPS:
While configuring Nginx and setting up HTTPS is not the easiest thing to do it brings a lot of benefits. Your website is more secure, better trusted by people, it runs faster and you'll be higher in the Google search results. While Nginx has a lot of configuration options and you might feel overwhelmed by the code it is still worth it to run your Odoo instances on Nginx.
Tip: Take some extra time to learn more about Nginx. Almost two third of the worlds biggest websites run on it and Nginx is growing fast.